Winter 2023-24
Sowing seeds for fun, flavor, and a successful harvest

Growing from seed offers many benefits, including greater variety, more disease resistance, and lower cost. Photo: Markus Spiske
Why start your own seeds?
Buying starts (aka seedlings) from a nursery is a convenient option, but starting your own seeds has many benefits:
- Greater variety: Starting with seed reveals a world of vegetables that you will never find in the market or nursery.
- Lower cost: Growing from seed is less expensive than buying starts.
- Encourages sharing: You can exchange different varieties with friends.
- Enhanced disease resistance: Growing from seed reduces the risk of introducing diseases into your garden.
- More control over timing: This can help when rotating crops or doing succession planting.
Which edibles should you grow?
- Grow what you like to eat!
- Grow crops that will thrive in your microclimate. For instance, if you live in a foggy summer area, growing beefsteak tomatoes may be challenging, but some cherry tomato varieties could work. Read seed packet labels carefully. As a general rule, cool-season plants perform best when average temperatures are 55°-75°F, while warm-season plants are most productive at 65°-95°F.
Tips for buying seeds
- Local nurseries are a good source of garden seeds, but most desirable varieties go fast and often need to be ordered online or by mail.
- Check out the seed library at the Novato Library, 1720 Novato Blvd.
- Choose seed companies that provide sufficient information about the seeds and include varieties well suited for your climate.
- Beware of new items with little accompanying information. The description often focuses on one desirable trait but ignores other features (example: the crop might be productive but not tasty).
- Treat a new variety as an experiment and start the time-tested variety as a back-up.
- Check the expiration date on seed packets to assure best germination potential. Some seeds, such as onions, parsley, and parsnip lose viability after about a year. Seeds of other vegetables are good for three years or more.
- Make sure the seeds are free of diseases and pests. Don’t save seeds from a plant with a disease and be careful accepting seeds from other people’s gardens. Never plant potatoes, onions, or garlic from grocery stores, as they might have diseases.
How to sow seeds indoors or in a cold frame outdoors
- Start early: sow seeds at least 3-6 weeks before transplanting the seedlings into the garden. Be sure to start your seeds at the right time of year. For example, start your cool-season crops (broccoli and cauliflower) indoors in January and transplant them into the garden in February-March. Start smaller seeds, except lettuce and arugula, in a protected indoor or outdoor environment and transplant them after they develop a full set of leaves. Lettuce and arugula might be seeded directly into the garden. Large seeds, such as beans, peas, or squash, might be started indoors to get an early crop.
- Set up appropriate growing conditions: Use a fine textured seeding mix or commercial potting soils, which provide proper water filtration and aeration. Avoid using garden soil that might become compacted and contain pathogens.
- Transplants started in late winter or early spring often appreciate receiving warmth from a plant heat mat or being in a warm greenhouse or cold frame.
- Transplants grown in the late summer for fall planting should germinate well at outdoor temperatures and do not need or want additional heat. The seeded containers can be kept outside in a protected spot in bright indirect sunlight.
- Protect from insect pests or animals, if necessary.
- Use containers that are at least 2 inches deep and have drainage holes. Clean and sterilize old containers that you plan to re-use. Cover the containers with plastic bags, plastic wrap, or clear domes to retain moisture. Make sure that the cover doesn't touch the soil surface.
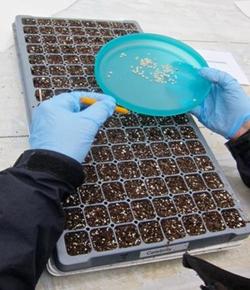
 Plant seeds indoors in containers with suitable planting soil mix. Photo: UC Marin Master Gardeners
 - Plant the seeds. Fill the container, flat, or cold frame with seeding mix. Level it out and use a chopstick or something similar to place the seeds more densely than recommended on the seed packet as some seeds will not germinate. Follow the instructions on the seed packet for planting depth, which is usually 2 to 4 times the diameter of the seed. Very fine seeds may be lightly pressed into the soil and watered with a mister.
- Label the seeds. Prepare plastic or wooden plant labels or write on the containers themselves using indelible ink pens or a plain lead pencil.
- Care for seedlings after planting. Keep the soil moist but not wet. Use a mister for watering, or place containers in a tray with one inch of warm water and, when saturated, remove the tray and let the containers drain. Avoid overwatering, because the soil may become too wet and the seeds will rot. Once the seeds germinate, ensure that plants have sufficient light and temperatures of 65°-70°F during the day and 55°-60°F at night. Check daily for germination and to make sure the soil surface stays moist. When the seeds begin to germinate, remove the cover immediately.
- Light indoors: If seedlings are grown indoors, be sure to provide light once the seeds germinate. Seedlings grown with insufficient light will get thin and leggy. Even a sunny window may not be enough light. Using grow lights and keeping the lights just above the leaves will help grow strong, sturdy seedlings.
- Light outdoors: For seedlings grown outdoors, give them full or slightly filtered sun exposure. When growing seedlings in summer for fall planting, you may need to shade them from the hottest afternoon sun.
- Thin and feed after sprouting: When seedlings are 1-inch tall, thin with scissors and give each seedling 2 inches of space around it. When the seedlings have at least 2 to 3 true leaves, feed them with half-strength fish emulsion.
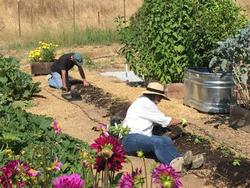
 Visit the Marin Master Gardener Edible Demonstration Garden in Novato for hands-on experience growing edibles. Photo: UC Marin Master Gardeners
 - Harden off seedlings: About 2 weeks before transplanting into the garden, expose the seedlings to lower outdoor temperatures and sunlight. Bringing the seedlings outdoors during the day for successively longer periods of time at least for a week prepares them for transplanting.
- Transplant seedlings into the garden when the danger of frost has passed or according to the recommended planting time. Protect from direct sun for the first few days.
- Once you have enjoyed your crop, save some of the seeds for next year’s garden and to share with friends and family. This helps protect and enhance a wide diversity of food crops.
Good luck starting your seeds and growing your edibles from scratch!
Learn more about growing edibles, including instructions for specific crops.


