Pruning Cuts
Because pruning cuts are wounds, it is important to make cuts in a manner that increases the likelihood that the wounds will seal and maintain the health of the plant.
There are four basic pruning cuts:
> Heading cut
> Thinning cut
> Releadering cut
> Jump cut
HEADING CUT
Use heading cuts:
• On small branches - To reduce the number of buds the plant needs to feed and grow, creating the possibility of more vigorous flowers and fruit from the buds that remain.
• On large branches - To restructure a plant (a multi-year process).
• On all branches - To remove dead, diseased, or damaged wood.
What is a heading cut?
Heading removes only a portion of a branch -- either only the branch tip and the next few buds or a branch down past one or more lateral branches.
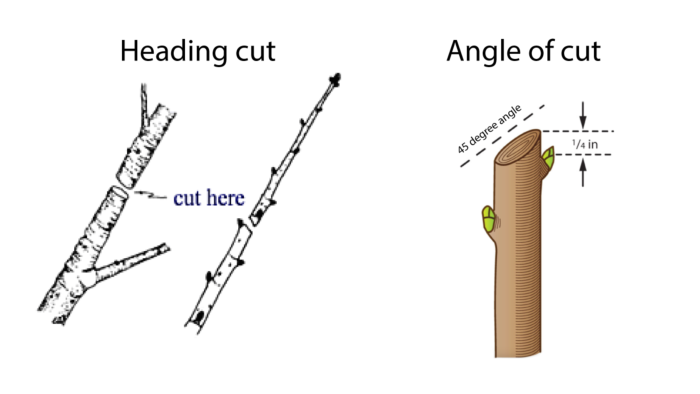
Make the cut about one-quarter of an inch above a bud or branch. If cutting to a bud, notice its direction. The new branch will grow in that direction.
Use heading cuts sparingly. They may seal poorly and become a disease portal. Depending upon the plant, they may cause the growth of a profusion of new branches called a “witches’ broom.”
THINNING CUT
Use thinning cuts for four purposes:
• To remove dense growth and allow more air and light to flow into the center of a plant and across to its shady side.
• To stimulate growth from the branches below each cut.
• To reveal the structure of a plant.
• To finely tune the shape of a plant.
What is a thinning cut?
A thinning cut removes an entire branch at its point of origin on the trunk of a tree or on another branch. Be careful. Do not remove the branch collar, which is the enlarged portion of the branch where it meets the trunk or another branch. This collar contains specialized cells that grow over and seal the wound.
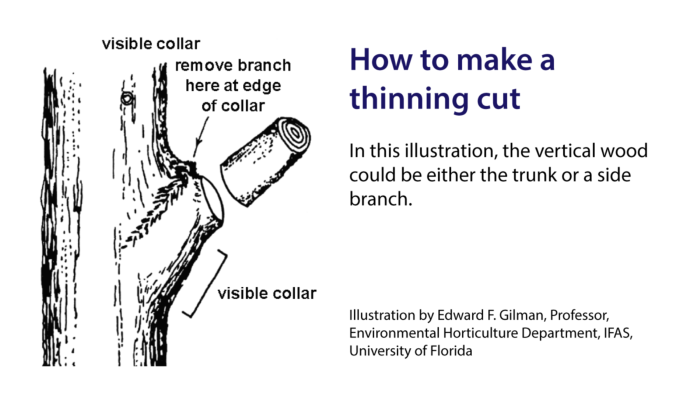
Cut immediately outside that boundary, leaving no stub that extends beyond that boundary. Stubs are physical barriers to the growth of the specialized cells in the branch collar that extend over and seal the cut.
When branch collars are not obvious
On some plants, the branch collar is not apparent. Use the illustration below to locate the angle of the correct cut.
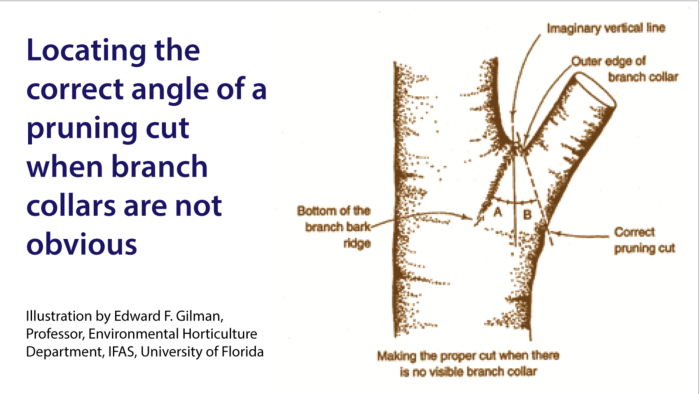
• Imagine a line that parallels the branch that will remain after the cut.
• Next, notice the angle between that imaginary line and the line of the branch bark ridge (marked as “A”).
• Finally, repeat that same angle on the other side of the imaginary line (marked as “B”) and cut along that plane.
Purpose of releadering cuts:
• To reduce the height, width, or density of a plant
• To redirect the growth of a plant. This allows reduction without topping or mechanical shearing.
What is a releadering cut?
Removes a portion of a branch at the point where two or more branches split – typically a “Y” junction of two branches. At this junction, one branch is always longer and thicker (the dominant branch or “leader”) and the other is always thinner and shorter (the subordinate branch). This cut removes the dominant branch at this point, and the side branch becomes the new leader.
Reduces crowding by eliminating a portion of a longer or taller branch (one that is expanding a plant’s height and width) in favor of a shorter branch.
Does not remove the dominant branch at its point of origin. Given its dominance, its point of origin is further down the plant, perhaps all the way at the base. As a result, the dominant branch has no branch collar at the point of the cut.
Thinning vs. releadering
The two images below illustrate the difference between a releadering cut and a thinning cut. The left image illustrates a thinning cut. The lateral branch on the right is removed at its origin, just outside the branch collar. On the right, the vertical (dominant) branch is removed, allowing the lateral branch to become the new leader.
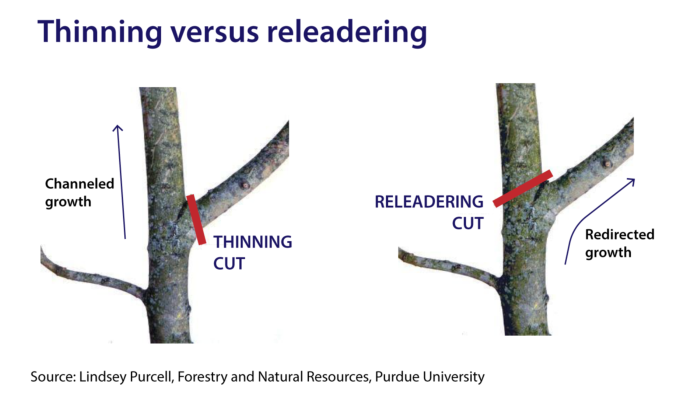
Notice the location of the cut. It occurs just above the branch that will become the new leader, without cutting into the branch bark ridge.
When making a releadering cut, it is important to follow three rules:
Rule 1: The branch that remains after the cut (the subordinate branch) should be at least one-third the size of the portion of the parent branch to which it is attached and which remains. In the illustration above, the lateral branch that remains should be at least one-third the size of the branch piece shown as severed.
Rule 2: the angle of the cut should be midway between the angle of the dominant branch and the angle of the subordinate branch.
Rule 3: A stub is often inevitable but try to leave a very short stub of no more than one-eighth to one-quarter of an inch where the leader is removed from the plant.
When you have co-dominant leaders
A releadering cut also can be used to shorten or eliminate one of two co-dominant leaders. Co-dominant leaders are two trunks of roughly equal diameter that meet at a shallow angle.
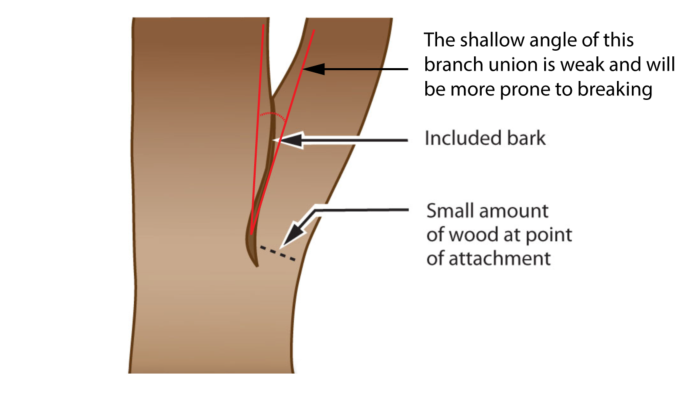
• The shallow angle creates a weak branch union and the likely site of a future break.
• In older trees, the branches may be too large to risk removing either, because a large cut may leave both a misshapen tree and a large wound that may not properly seal.
• It is important to subordinate one of the trunks by shortening it.
• In younger trees, it is advisable to remove or shorten one of the two co-dominant leaders as early in the tree’s life as possible. This early removal greatly reduces the diameter of the cut and the tree’s consequent effort to seal it.
Removing a co-dominant leader in phases
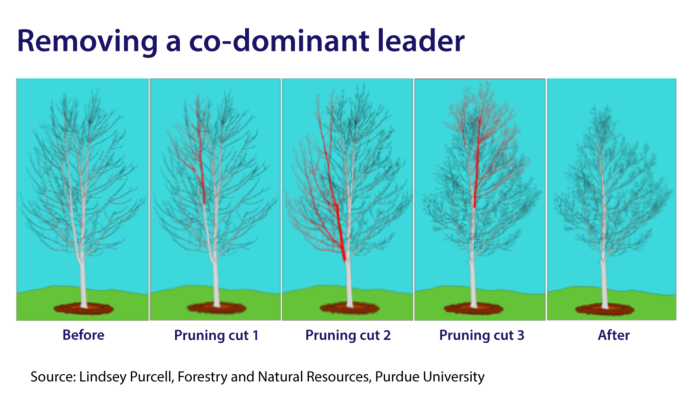
In the illustration below, notice the co-dominant leaders and how the succession of cuts – over two or three years – first shortens and then removes one of the competing leaders.
JUMP CUT
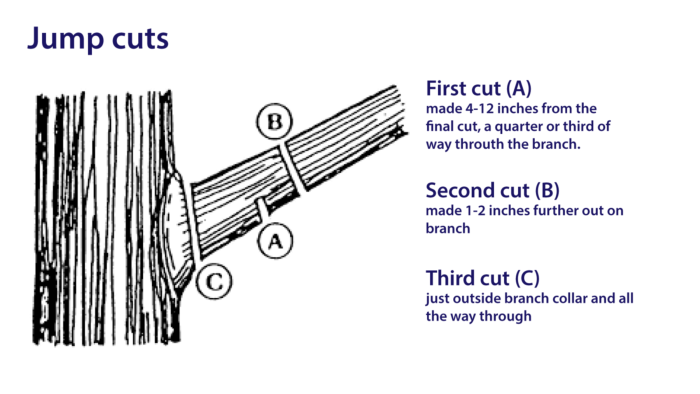
A jump cut removes heavy branches in three steps to avoid tearing the bark and damaging the plant. Use a jump cut to sever and lighten a branch just beyond an intended final cut. This weight reduction avoids having the severed portion snap at the point of the cut and harm the plant.
How to make a jump cut (see diagram below or watch the video)
• Make the first cut (A) from below the branch, 4 to 12 inches away from the final cut, and one-quarter to one-third of the way through the branch.
• Make the second cut (B) 1 to 2 inches further out the branch and all the way through. The portion beyond B will fall, and any tear in the bark will stop at A.
• Make the third cut (C) just outside the branch collar and all the way through.
