Lawn: use it or lose it
-
One of the most frequent questions asked of the Master Gardeners is, “How do I get rid of my lawn and plant something else in its place?” Fortunately, there is an easy and effective method for replacing your lawn, and it doesn’t require special equipment, chemicals, large expense or the need to dig it out. It’s called sheet composting, and fall is a great time to get started. Step-by-step instructions are provided below. To watch the process in action, check out this sheet composting video.
Why is everyone getting rid of their lawn?
Lawns are great for kids and parks and ball fields. But they’re murder on your water bill, demand significant maintenance and drain our reservoirs. For some people, lawns are so ubiquitous that their presence isn’t even questioned. For the more eco-minded, however, lawns have become the poster children for unsustainable, inappropriate plants.
There are many reasons to replace a lawn, including:- your kids have outgrown it
- you want to save water, time, energy and money
- you want to look at something more interesting and colorful
- you want or need garden space for something else (edibles, fruit trees, patio, a path, a cutting garden, a pond, etc.)
- you want a more updated look for your front entry
- you’re tired of maintaining it
- you want to garden the “bay-friendly” way, which includes cutting down on water usage and runoff
- you want to take advantage of a “cash for grass” program, such as that offered by the North Marin Water District.
Easiest method for lawn replacement? Smother and cover.
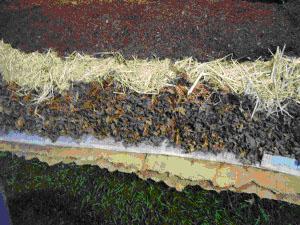
The easiest way to convert all or part of your lawn into something else is to smother it. Sheet composting, otherwise known as the “lasagna method,” is a gardener’s best weapon for turning a compacted, nasty patch of weeds or lawn into plantable space. The only supplies required are 1) cardboard or thick layers of newspaper, 2) compost or other organic material and 3) mulch. Here are the 10 steps to success:- Mow your lawn as low as possible. Leave the grass clippings.
- Tag your sprinkler heads so you know where they are. You can cap them off or switch them to a drip system later.
- Water the remaining grass thoroughly.
- Spread balanced organic fertilizer or rock dust (optional).
- Plant any large plants that will go into the new area (five gallons or larger).
- Cover the lawn with cardboard or thick layers of newspaper. Be sure to overlap the edges at least six inches so that no light can reach the grass. Similarly, be sure to exceed the perimeter of the lawn by a few inches so that no light can peek through on the edges. Soak this layer with water.
- Spread six inches of compost, manure and/or other organic material on the cardboard layer.
- If you already know what you want to plant, go ahead and place plants directly into the sheet composting concoction.
- Hook up your drip system if available.
- Spread a two-inch layer of mulch. Good options include wood chips (often available free from tree pruning companies) or rice straw. Be sure your mulching material does not contain weed seeds.
Your lawn is gone. Now what?
Deciding what to install where your lawn was is all about function. Do you need to walk on it? Will dogs and kids be playing there? Do you want to grow edibles? Would hardscape such as stone pavers be a good choice? Focus on function first. In the meantime, here are some suggestions of plants that are lawn-like, in case you want to keep it low and green:- Delta Bluegrass – This company offers native and non-native lawn alternatives. Each option creates a slightly different meadow-like look and will take some foot traffic. Let them grow up to a foot long (and a little floppy) or keep them mowed. If given a little water in the summer they should stay green; if left to their own devices, they will turn a golden color in summertime but then bounce right back to green once the rains come.
- Pacific Sod No Mow – This grass creates a meadow-like look. Unfortunately, it doesn’t take much foot traffic, so a few stepping stones artfully placed would be a beautiful as well as functional addition. Left unmowed it grows up to 18 inches tall. It takes a third less water than a typical lawn and likes partial shade.
- Native bunch grasses – The key difference between bunch grasses and regular lawn grass is that conventional grass spreads underground by rhizomes and therefore creates a flat mat. Bunch grasses are, well, bunchier. They form little mounds that over time take on a naturalistic look and feel. Check out the entrance to the Strawberry Village Shopping Center in Mill Valley or Crissy Field in San Francisco for good examples. There are a handful of Carex species that create wavy swaths of green. Carex pansa, or dune sedge, is an evergreen, creeping grass that grows well in full sun or partial shade. It grows to less than a foot tall and only requires mowing three or four times a year and watering two to four times a year. A cousin, Carex praegracilis, is very similar in appearance but grows over two feet tall. Another native grass, Festuca rubra, takes some foot traffic and is drought tolerant. It is an easy-to-grow, fine-textured grass that likes a little shade. It makes a lovely naturalistic lawn or can be mowed to look more like conventional turf.
- Other ornamental grasses – There are so many other beautiful, colorful grasses available. Of course, like their native counterparts, many get too tall or too lumpy to create a walkable surface, but a small patio or meandering path placed between a mixed border of ornamental grasses is stunning. A few to consider are blue oat grass (Helictotrichon sempervirens), atlas fescue, (Festuca mairei), and autumn moorgrass (Sesleria autumnalis).
 A delicious slice of lawn lasagna. Photo: Dave Egbert
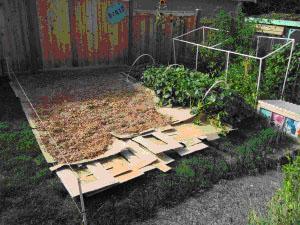
 Work in progress: expanding the vegetable garden. Photo: Stacy Brewer


