Saving Specific Plant Seeds
Tips for some of the easiest types of plants from which to save seeds:
> Tomatoes
> Squash & melons
> Peppers
> Beans & Peas
How to save tomato seeds

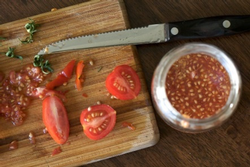
Step 1. Cut the tomato open and squeeze the pulp juice and seeds into a clean cup. Add about half as much water as there are tomato seeds and juice in the bowl.
Step 2. Set the containers aside to ferment. This allows the gelatinous material around the seeds to break down. Fermentation can take from 24 to up to 96 hours to occur. A mold layer may develop during this time. It is not a problem.
Step 3. Good seeds will settle to the bottom of the bowl. Gently pour off mold, debris, and any seeds that float (they are hollow). Pour seeds into a colander and wash thoroughly.
Step 4. Spread seeds out loosely on a paper plate, coffee filter, paper towel, or any surface that will help them dry faster. Do not allow them to clump together. Do not put the seeds in sunlight or the oven. Seeds may take up to four weeks to dry completely. Warning: Tomato seeds can germinate unless you dry them quickly.
Step 5. Store seeds in glass or plastic container in a cool dry place. Seeds remain viable for up to 4 years.

_____________________________
How to save squash and melon seeds

Step 1. To remove squash seeds from the fruits, split the squash in half by shallowly cutting through the rind from top to bottom on both sides and separating the two halves. Cutting through the center of the fruit can damage seeds.
Step 2. Scoop out the seeds and free them from the pulp as much as possible. Transfer seeds to a wide-mesh strainer. Running the seeds under a strong stream of water will help dislodge the seeds from the pulp. When working with varieties whose seeds are hard to separate from the pulp, soak the seeds for a few hours to help in the cleaning process. Lightweight and underdeveloped seeds will usually float on top, while mature, viable seeds will sink to bottom. Decant and keep only those seeds that have sunk to bottom. This method is only effective for some types of squash because the viable seeds of many varieties will float, rather than sink.
Step 3. Spread clean seeds on paper towels or newspaper. Dry completely. The drying process may take a few days. To determine if the seeds are completely dry, squeeze a seed, it should feel hard and brittle. If it feels slightly spongy, it needs to dry a bit longer.
Step 4. Pour the seeds into airtight containers and put them in a cool, dry storage place. Squash seeds remain viable for up to six years when stored properly.
Or, leave squash to overwinter and transplant germinated seedlings when ready.
_____________________________
How to save pepper seeds

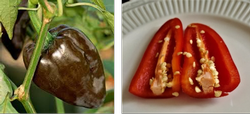
Step 1. Allow some fruits to stay on the plants until they become fully ripe and start to wrinkle. The seeds are mature after the peppers have changed color, indicating final ripeness. Harvest fruits up to two weeks past edible stage.
Step 2. Cut the peppers open, scrape out the seeds onto a plate, and let the seeds dry in a non-humid, shaded place, testing them occasionally until they break rather than bend.
Step 3. Pepper seeds remain viable for up to three years if stored properly.
_____________________________
Saving peas and beans
Step 1. Save peas and beans by allowing the pods to ripen on the plants until they are dry and starting to turn brown, with the seeds rattling inside. Pods should be brown, dry, and brittle before harvest, and the seeds inside should be hard as rocks.
Step 2. This may be as long as a month after you would normally harvest the peas or beans to eat.
Step 3. Strip the pods from the plants and spread them out to dry indoors.
Step 4. They should dry at least two weeks before shelling, or you can leave the seeds in the pods until planting time.
Step 5. Pea and bean seeds will remain viable for up to three years if stored properly.

